Replacing retractable awning fabric involves removing the old fabric, cleaning the roller, measuring accurately, and installing new material with even tension. Choosing durable, UV-resistant fabric and ensuring proper tensioning keeps your awning smooth, functional, and long-lasting.
What You Need to Know About Replacing Awning Fabric
Awning fabric replacement restores shade, boosts curb appeal, and extends your awning’s life.
With accurate measuring, thorough cleaning, and proper installation, it’s a straightforward project that ensures smooth operation and lasting durability. Key essentials for success:
- Tools you need: Allen wrenches, clamps, ladder, screwdrivers, and safety gloves.
- Time required: 2–5 hours for most awnings; having help speeds up and ensures safety.
- Accurate measuring: Measure width from arm-to-arm and projection from wall to extended edge.
- Fabric choice: Select materials suited to your climate, vinyl for damp areas, acrylic for sunny regions, or polyester for general weather resistance.
- Tensioning matters: Properly adjusted tension prevents sagging and ensures smooth retraction.
Replacing fabric boosts energy efficiency, reduces hardware wear, and refreshes outdoor comfort. Done right, it enhances aesthetics and provides years of reliable shade.
Next, discover key mistakes to avoid and maintenance tips to keep it lasting.
The Step-by-Step Process That Makes Awning Fabric Replacement Simple
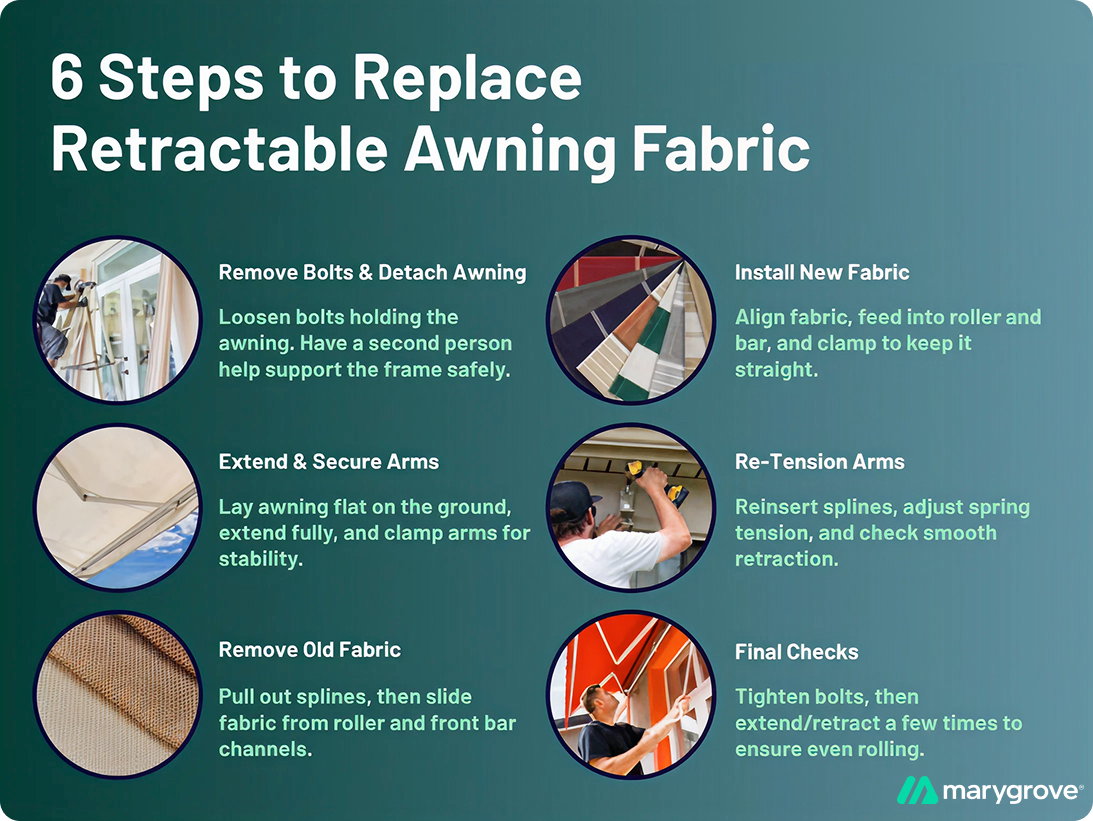
Replacing your retractable awning fabric might sound intimidating at first glance, but with the right tools, preparation, and a steady approach, it’s absolutely doable for many homeowners.
This step-by-step process will walk you through each stage clearly so you can avoid confusion and get it right the first time.
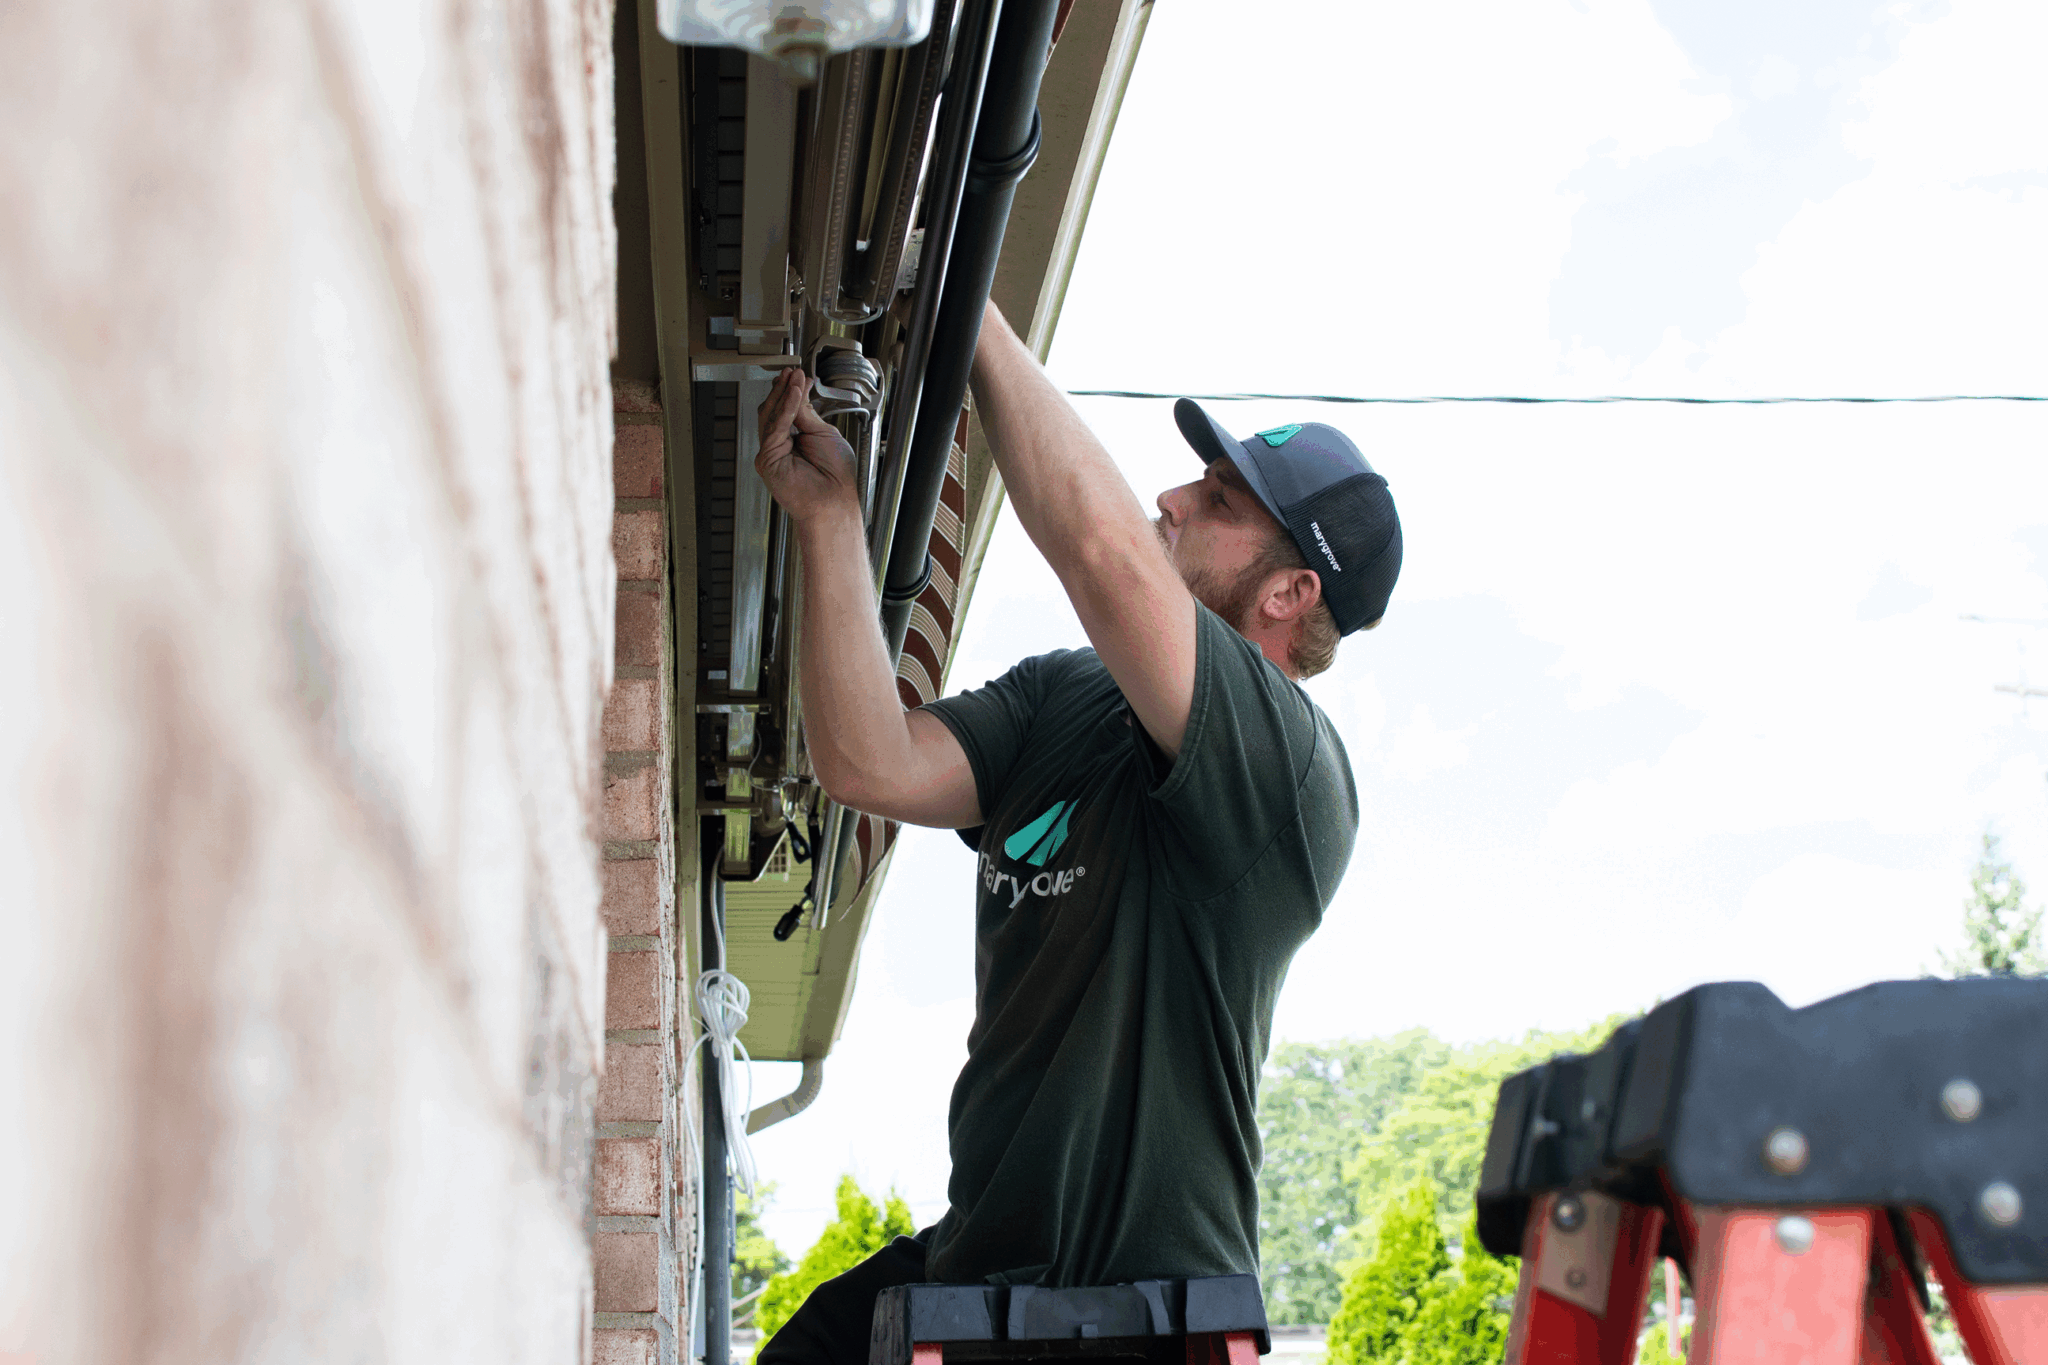
1. Remove Bolts and Detach the Awning from the Wall
Start by loosening and removing the bolts or brackets holding the awning in place.
Always have a second person assist you here to safely support the frame while it is detached. This step prevents strain on the arms and avoids damage to your home’s siding or masonry.
2. Fully Extend the Awning on the Ground and Secure the Arms
Once detached, lay the awning flat on a clean, level surface. Fully extend it and use clamps or temporary supports to secure the arms in position.
This keeps the frame steady and makes it much easier to access the roller and front bar.
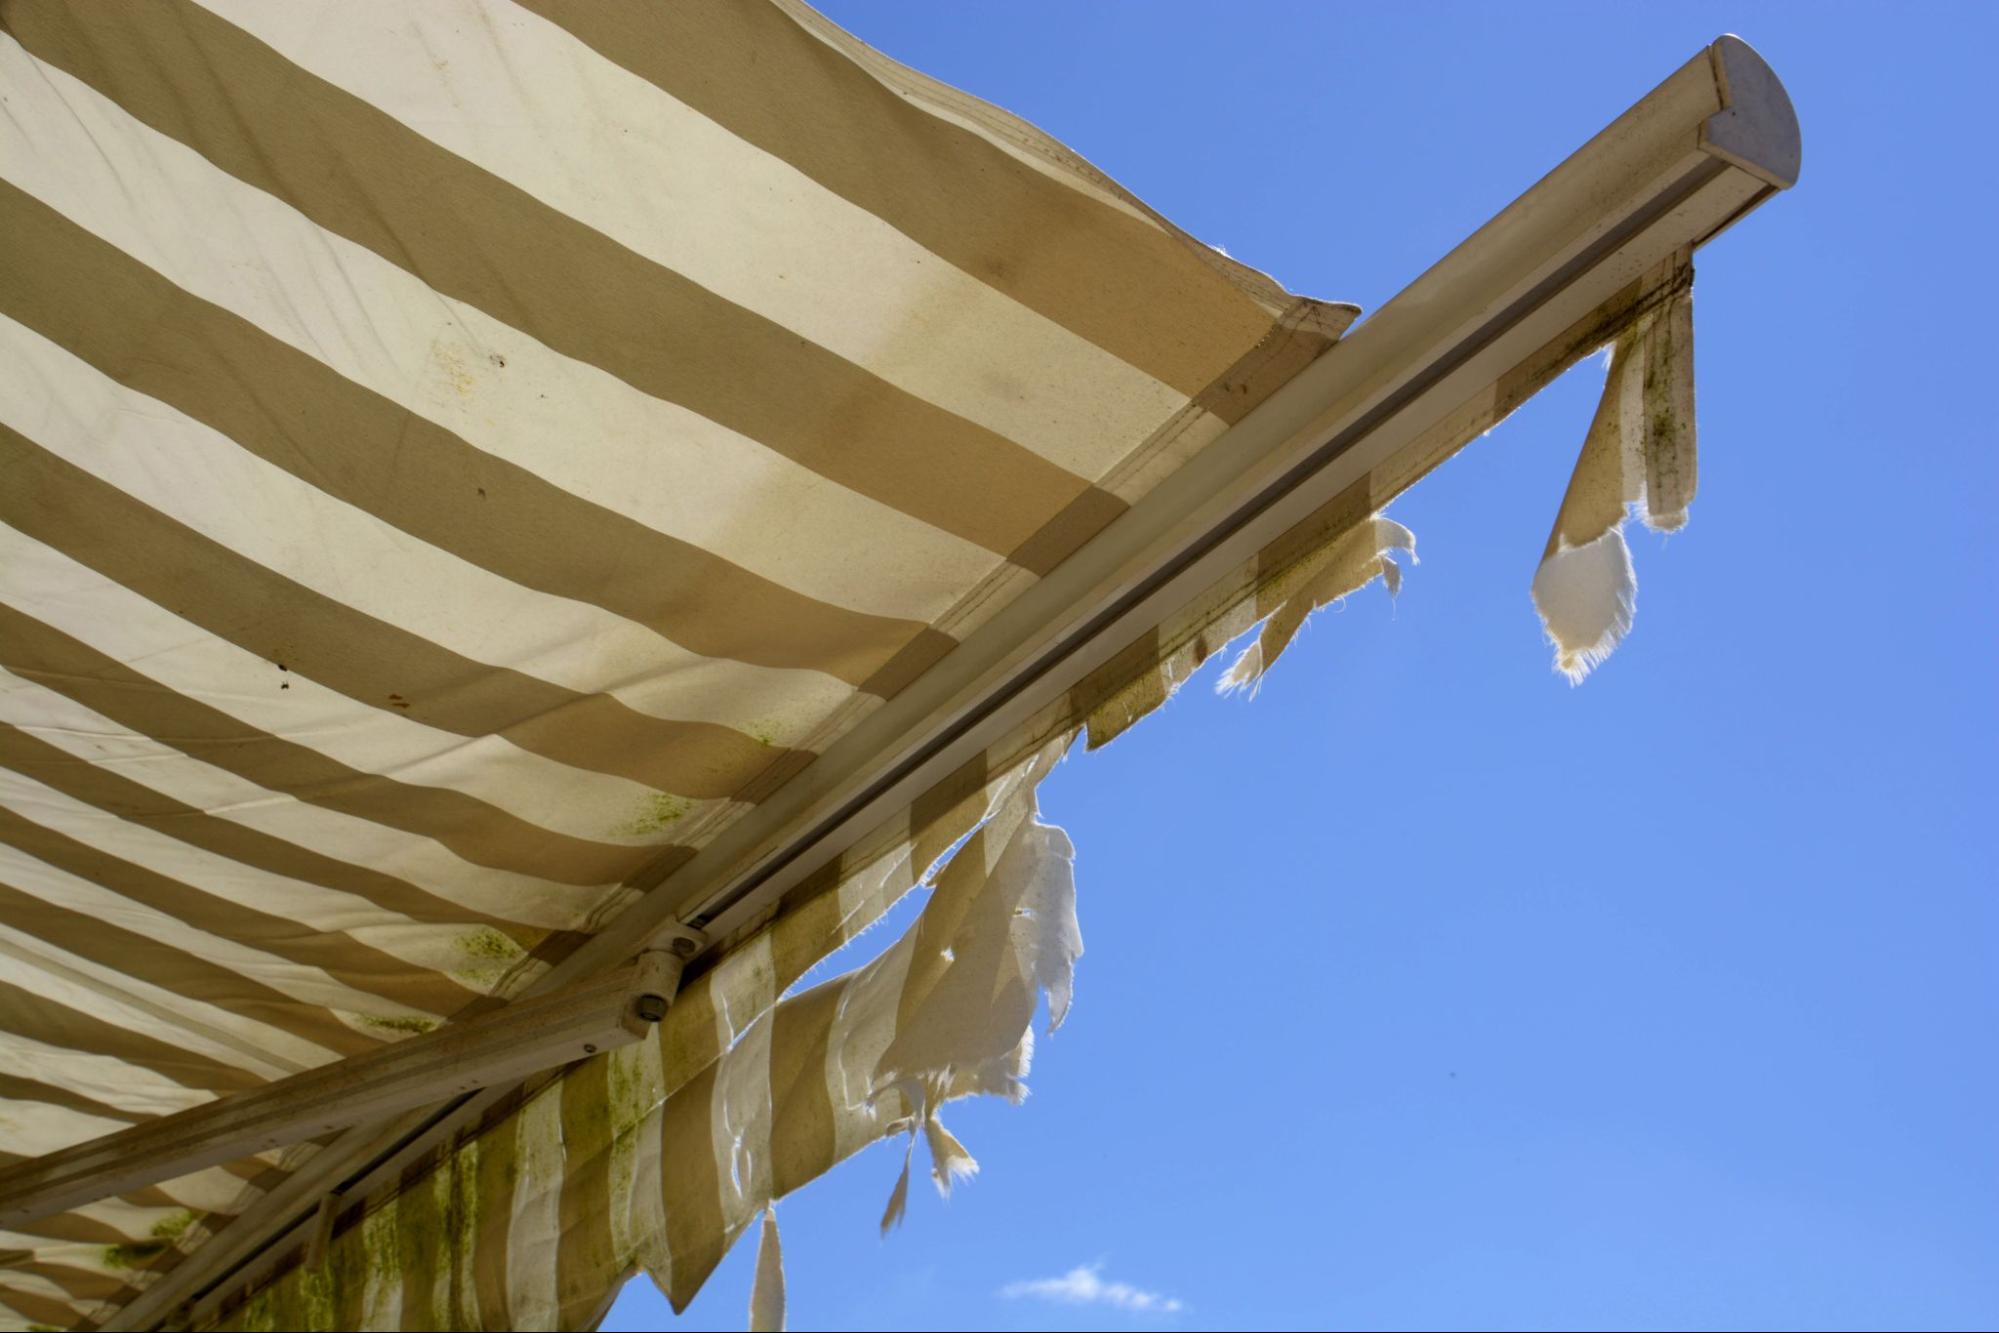
3. Remove the Old Fabric Splines and Slide Out the Fabric
Locate the fabric splines (thin cords that hold the fabric edges in the roller grooves) and gently pull them free. After removing the splines, slide the old fabric out of both the roller and front bar channels.
Check for any fraying that might snag during removal.
4. Feed New Fabric into the Roller and Front Bar Channels
Position your new fabric so it aligns evenly across the roller. Feed one edge into the roller groove and the other into the front bar channel.
Use clamps to hold each side in place as you work across the length of the awning. This ensures straight alignment and prevents the fabric from shifting while you insert the splines.
5. Re-Tension the Arms and Reinstall the Housing
With the fabric in place, carefully reinsert the splines, then reassemble the roller and awning arms. This is where tensioning matters.
For manual awnings, adjust the spring tension so the fabric retracts smoothly but without sagging. For motorized systems, check alignment before reconnecting power.
6. Final Checks: Alignment and Secure Bolting
Reattach the housing to the brackets and tighten all bolts securely.
Fully extend and retract the awning two or three times to ensure smooth operation and confirm there is no fabric bunching or uneven rolling.
With the basics of replacing your awning fabric covered, it’s just as important to understand the common mistakes that can derail the process and compromise your results.
The Hidden Mistakes That Ruin Awning Fabric Replacements (and How to Avoid Them)
Even simple fabric replacements can go wrong if key details are overlooked.
Proper alignment, preparation, and fabric choice are essential to avoid frustration and costly redos. Here are the most common mistakes to watch for:
- Over-tightening the fabric: Excessive tension can warp the roller, strain seams, and cause uneven retraction. Aim for snug, even tension so the awning retracts smoothly.
- Skipping roller tube cleaning: Dirt or rust acts like sandpaper, wearing down fabric quickly. Clean the roller thoroughly with mild detergent and remove corrosion before installation.
- Rolling wet fabric: Trapping moisture by rolling damp fabric leads to mildew and odor. Always ensure the fabric is fully dry before retracting.
- Using low-quality fabrics: Cheap, non-UV fabrics fade quickly and weaken in sunlight. Professional-grade materials hold their color and strength much longer.
- Choosing the wrong fabric type:
- Polyester: Best all-around choice, highly durable, weather-resistant, and low-maintenance.
- Vinyl: Good for humid or rainy climates with mildew resistance.
- Acrylic-coated: Strong UV protection but gradual fading in direct sun.
- Cotton canvas: Least durable, prone to fading and mold.
- DIY sewing challenges: Awning fabric requires industrial stitching. Pre-hemmed, professionally cut fabrics eliminate weak seams and poor fit.

By steering clear of these common mistakes, you set the stage for a longer-lasting, better-performing awning fabric.
But replacement is just the beginning, proper care is what truly preserves its look and function.
Next, let’s focus on simple maintenance habits that keep your awning fabric in top condition year after year. And if you need professional awning maintenance, you’re always welcome to check out our Mint Program.
Maintenance Habits That Keep Your New Awning Fabric Looking Brand New
By following these proven care tips, you can ensure your awning continues to perform well and look great for years to come.
1. Wash and Rinse on a Regular Schedule
Plan for a light cleaning at least twice a year.
Use mild detergent mixed with water and a soft-bristle brush or sponge to remove dirt, bird droppings, and debris.
After cleaning, rinse thoroughly with a garden hose to prevent soap residue from stiffening the fabric. Avoid harsh chemicals or power washers, which can weaken fibers and strip protective coatings.
Related Resource → Keep Birds Out of Retractable Awnings: Complete Guide
2. Retract During High Winds or Storms
Wind is one of the fastest ways to damage awning fabric and hardware. If wind speeds exceed 20 mph, retract your awning to protect both the material and the arms.
For added peace of mind, wind sensors can automate this process, retracting the awning before gusts become destructive.
3. Never Store Wet Fabric
Moisture is the number one cause of mildew.
Always allow the awning fabric to dry completely before retracting it into its housing. If a sudden rainstorm soaks it, extend the awning afterward in dry conditions to air it out.
This simple step eliminates trapped dampness that can lead to mold growth and discoloration.
4. Use a Full Cassette Housing for Extra Protection
A fully enclosed awning cassette shields the fabric when retracted, preventing sun bleaching, rain exposure, and dirt buildup.
Unlike open rollers, which leave fabric partially exposed, cassette systems provide year-round protection and can significantly increase the lifespan of your awning fabric.
5. Seasonal Inspection Checklist
Every spring and fall, take a few minutes to check:
- Seams and stitching: Look for fraying or loosening threads.
- Tension arms: Ensure they operate smoothly and maintain consistent pressure.
- Spline channels: Confirm that the fabric edges remain secure and splines are intact.
- Housing cleanliness: Wipe down dust or insects inside the cassette or roller area.
Routine inspections allow you to catch small issues before they become bigger, costlier problems.
6. Preventing Mildew from Returning
If mildew has been an issue in the past, prevention is key.
Keep the fabric dry and clean, but also consider materials that resist mold naturally, like vinyl or acrylic-coated fabrics.
For added protection, apply a fabric-safe water-repellent spray once or twice a year to create a barrier against moisture.
With maintenance covered, let’s explore why professional expertise can be invaluable, not only to avoid costly errors but also to protect your awning investment over the long term.
Helpful Resource → Clean Mold Off Awnings Without Damage: Complete Guide
Why Expert Assistance May Save You More Than a DIY Attempt Ever Could
While DIY awning fabric replacement may seem straightforward, expert help often delivers better results while avoiding hidden risks.
Here are six key reasons why professional assistance is worth considering:
- Safety assurance: Working on ladders with heavy hardware carries real danger. Professionals are trained to handle these tasks safely and reduce the risk of falls or injuries.
- Correct tensioning: Precise fabric tensioning is critical for smooth operation. Experts use specialized tools and techniques to ensure the fabric retracts evenly without sagging or strain.
- Proper frame handling: Professionals dismantle and reassemble the frame without bending arms or misaligning components, a common DIY mistake that affects performance.
- Seamless fabric fit: Fabrics are cut and sewn with industrial equipment to match exact dimensions, eliminating wrinkles or poor alignment caused by imprecise DIY cuts.
- Integration of upgrades: Professionals can install wind sensors, automated retraction features, and premium UV-protected fabrics during the same visit.
- Warranty-backed confidence: Expert installation not only protects manufacturer warranties but often comes with workmanship guarantees for added peace of mind.
By relying on expert assistance, you not only avoid costly errors but also gain the confidence that your awning is installed for long-term performance.
This professional touch ensures your fabric replacement is done right the first time, leaving you free to enjoy a hassle-free, durable upgrade.
Looking to Replace Your Awning Fabric the Right Way?
Replacing your retractable awning fabric is one of those projects that’s best done right the first time.
From accurate awning measurements and precise tensioning to selecting the right material, each step plays a critical role in how well your awning performs and how long it lasts.
A well-installed fabric replacement restores your awning’s appearance, extends its life, and keeps your outdoor space comfortable and inviting for years.
If you’re looking to replace your old awning fabric with a top-quality fabric upgrade, contact our team today.
We’ll help you choose the best material and ensure a seamless, professional replacement for long-lasting results.