Installing a retractable awning on stucco requires anchoring through to studs or headers, using proper fasteners, sealing all penetrations, and accounting for the wall’s layers to avoid cracks, water intrusion, and instability.
How to Install a Retractable Awning on Stucco: Essentials
- Find studs or headers: Stucco isn’t structural, so anchor into framing for stability.
- Use proper tools: A hammer drill with masonry bits and heavy-duty lag screws is essential.
- Prep uneven surfaces: Shim or use a ledger board to create a flush mount without grinding.
- Handle EIFS carefully: Foam-backed stucco needs lighter torque to prevent crushing.
- Seal every hole: Apply exterior-grade caulk around fasteners to prevent water damage.
- Plan for wind: Install smart sensors or retract the awning during gusts to protect brackets.
Done right, this prevents damage, ensures solid support, and protects your exterior.
With proper technique or expert help, you can install an awning that’s secure, durable, and safe for stucco. Keep reading for steps, tips, and pitfalls to avoid.
What Makes Stucco So Tricky? Understanding the Wall You’re Dealing With
Installing a retractable awning on stucco involves more than simple drilling. Stucco walls are layered and fragile, and understanding their makeup is key to a safe, lasting installation.
- Hardcoat vs. EIFS Stucco: Hardcoat is cement-based and rigid, prone to cracking under stress. EIFS uses foam insulation and a thin coating, offering energy efficiency but less impact resistance and requiring more delicate handling.
- Stucco Is Not Structural: Stucco is a finish, not a load-bearing layer. Anchors must pass through to wall studs or headers to support the torque and weight of a retractable awning.
- Layers Behind Stucco Vary: Walls may have sheathing over studs, foam insulation, or even gaps where sheathing is missing. These differences affect how fasteners hold and whether spacers or shims are necessary.
- Risk of Damage: Incorrect drilling can cause cracks, crushed foam insulation, or water intrusion. Unsealed holes can lead to hidden wood rot and freeze-thaw issues over time.
- Common Misconceptions: Many assume stucco is solid or that light-duty anchors suffice. Others overlook uneven surfaces or the need for specialized tools to mount securely.
Understanding these nuances is the first step toward a safe, lasting installation.
With this foundation in place, you can move on to the step-by-step process that ensures your retractable awning is securely mounted without damaging your stucco walls.
Installing Awnings on Stucco? Here’s Every Step You Need to Know
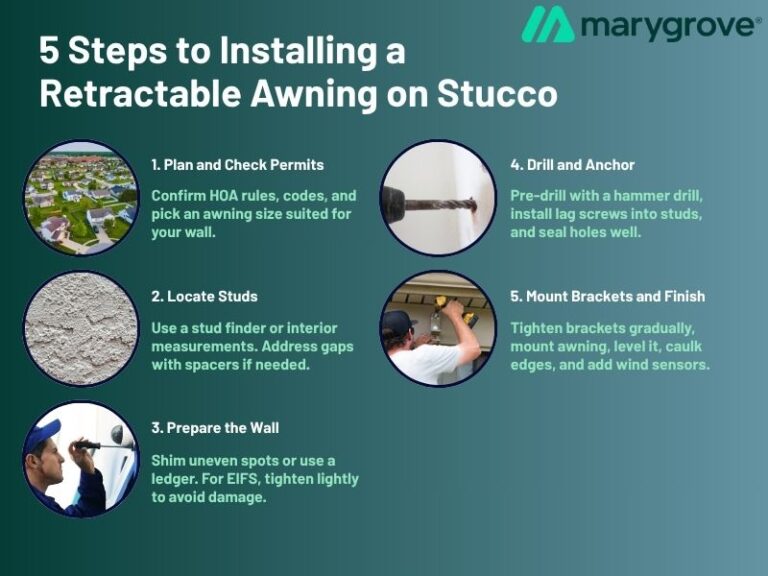
Installing a retractable awning on stucco takes planning, precision, and the right tools. Done correctly, it ensures your wall stays intact while supporting the weight and torque of your awning.
Planning and Permits
Begin by checking HOA rules and local codes, as some areas require permits. Identify load-bearing points like studs or headers since stucco alone cannot support an awning.
Choose an awning size that fits your wall’s structure to prevent excess stress.
Locating Studs Through Stucco
Use a deep-scan stud finder or measure from interior walls to mark stud locations outside.
Homes without sheathing may have gaps behind stucco, which require careful drilling and additional blocking or spacers for safe anchoring.
Preparing the Wall
Uneven stucco can prevent flush mounting. Use a ledger board to create a flat surface or shims to fill small gaps without grinding.
Foam-backed EIFS requires extra care to avoid crushing insulation during tightening.
Drilling and Anchoring
Drill pilot holes using a hammer drill and masonry bit, then install heavy-duty lag screws long enough to penetrate studs.
Seal all holes with exterior-grade silicone to prevent moisture damage.
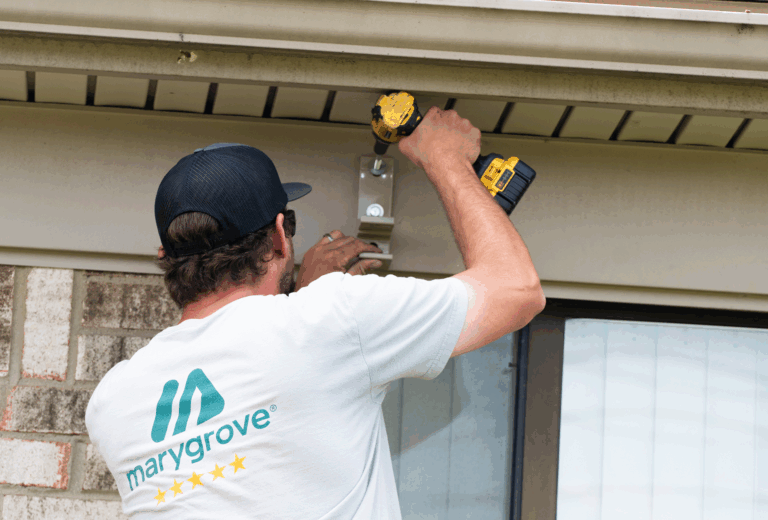
Installing the Brackets and Final Checks
Position brackets precisely and tighten gradually to avoid cracking stucco. Lift and secure the awning with help, then confirm it’s level.
Apply caulk around brackets and consider wind sensors for added protection.
Following these steps creates a secure installation that protects both your awning and stucco.
Next, we’ll look at the common mistakes that can undermine all this work and how to avoid them.
Helpful Resource → How to Measure for an Awning (Without Mistakes)
Common DIY Mistakes When Installing a Retractable Awning on Stucco (and How to Avoid Them)
Even a well-planned awning installation can fail if common mistakes aren’t addressed.
Stucco requires careful handling, and small errors can lead to cracks, moisture damage, or unstable brackets.
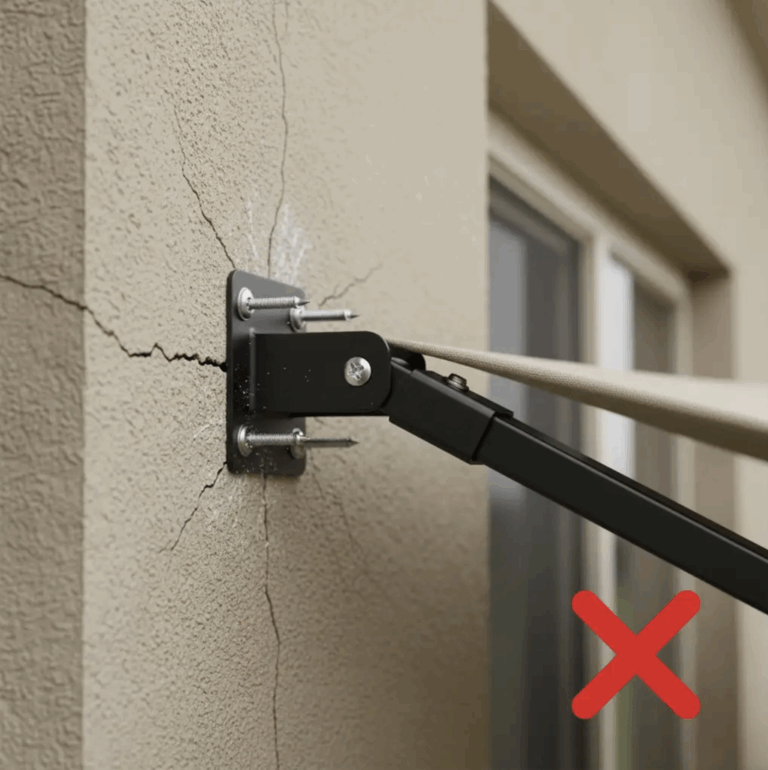
1. Anchoring Only into Stucco or Using Plastic Wall Plugs
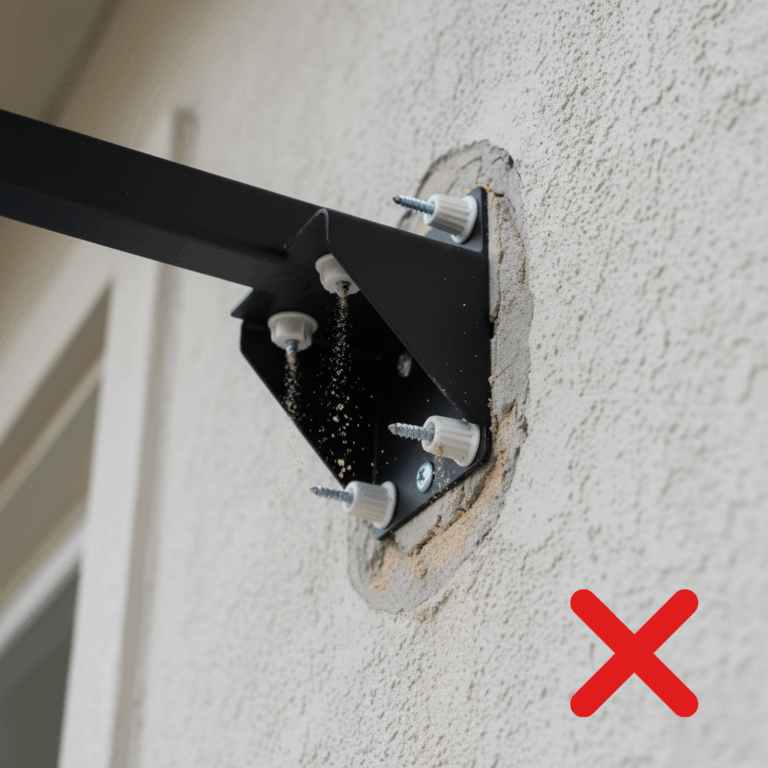
Stucco itself is not structural. Anchoring into it or using light-duty wall plugs cannot support an awning’s weight or torque.
Always drill through stucco into studs or headers for a secure installation.
2. Applying Too Much Torque and Cracking the Surface
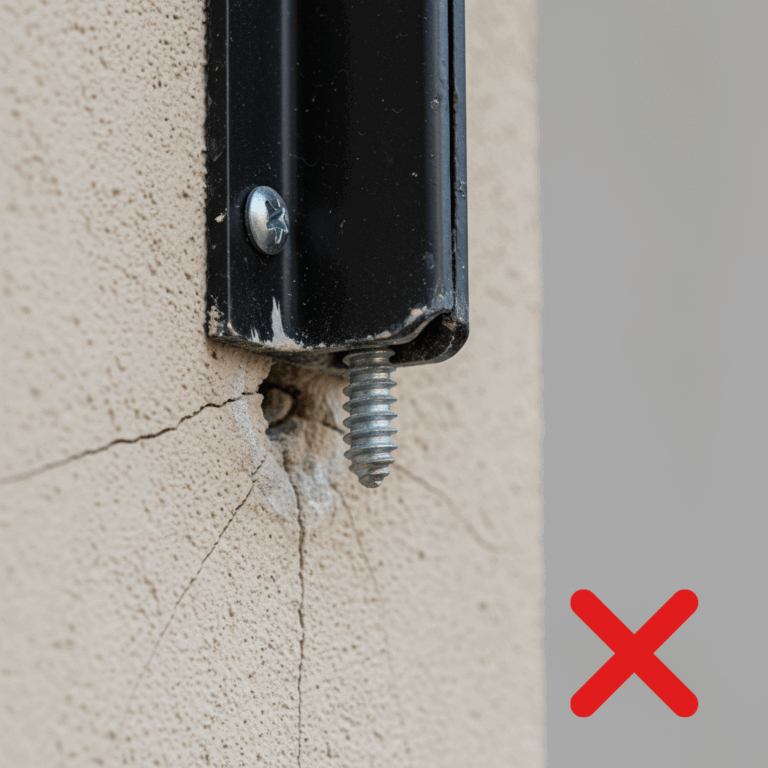
Over-tightening fasteners can fracture stucco or compress foam insulation in EIFS systems. Tighten gradually, using washers to spread load pressure evenly across the surface.
3. Overlooking Foam Layers or Structural Voids
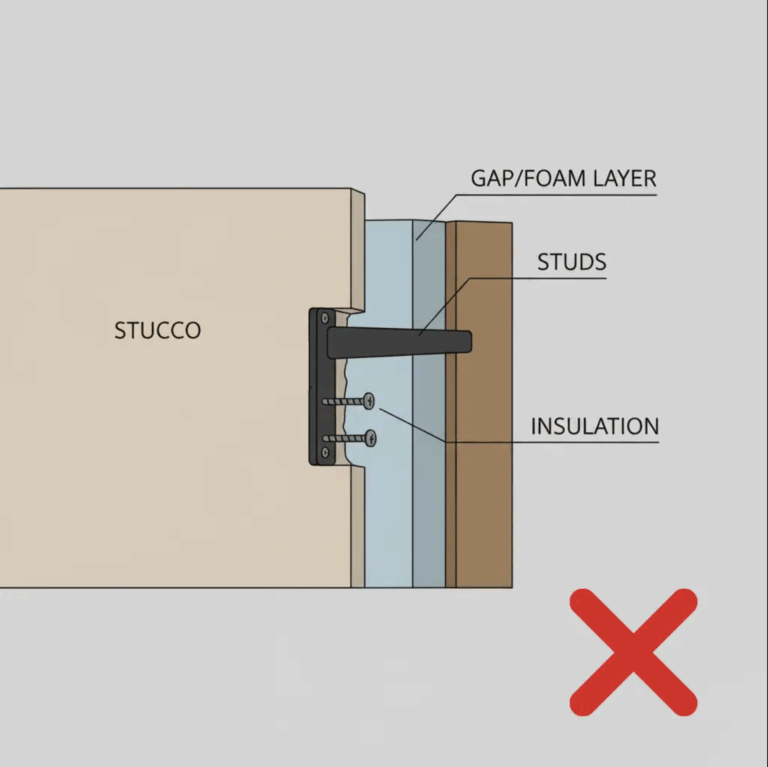
Walls with insulation or gaps behind the stucco pose risks if not accounted for. Use spacers or shims to fill voids and ensure lag screws reach framing for a stable hold.
4. Forgetting to Waterproof Mounting Points
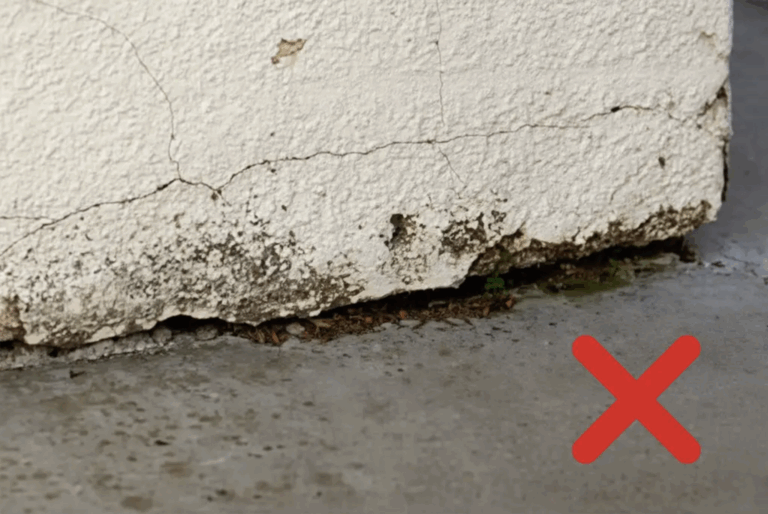
Leaving fastener holes unsealed allows water infiltration, causing hidden wood rot and freeze-thaw cracking.
Apply exterior-grade sealant around each penetration to prevent long-term damage.
5. Ignoring Wind-Load Risks
Awnings face strong wind pressure. Skipping wind sensors or relying on weak anchoring can lead to pullout or bracket failure over time.
6. Poor Aesthetics from Misaligned Ledgers
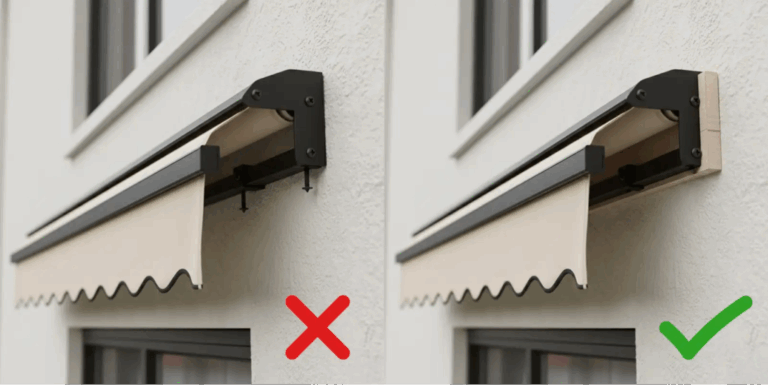
Uneven stucco can create crooked ledgers and sagging brackets. Instead of grinding stucco flat, use shims to level brackets without harming the finish.
Avoiding these pitfalls is essential, but even careful DIY work has limits when it comes to stucco’s hidden complexities.
This is where professional expertise makes a real difference, ensuring your awning is installed securely and safely from the start.
Helpful Resource → Can You Use Retractable Awnings in the Rain?
Why Professional Retractable Awning Installation on Stucco Is Worth It

Stucco may appear solid, but its hidden layers make awning installation complex. Professionals bring expertise, tools, and precision to ensure a safe, lasting result.
- Understanding Wall Construction: Pros evaluate what’s behind the stucco, sheathing, foam, or framing, and choose the right fasteners, anchoring points, and techniques to avoid weak spots or damage.
- Using Proper Hardware and Tools: Professional installers rely on impact-rated drills, heavy-duty fasteners, and shims to ensure brackets are secure without cracking stucco or crushing insulation.
- Preventing Moisture Damage: Experts seal every penetration with exterior-grade caulk and add flashing where needed, reducing the risk of water intrusion, rot, and mold inside wall cavities.
- Enhancing Safety and Performance: Installers integrate smart features like wind sensors or automated retraction systems to protect both the awning and your stucco wall during high winds.
- Providing Accountability and Guarantees: Professional services include warranties and service guarantees, ensuring any rare issues are resolved quickly and correctly for long-term peace of mind.
By leveraging this expertise, you avoid the risks of hidden damage and ensure your awning is both functional and safe, preserving your stucco exterior for years to come.
Final Thoughts on Installing a Retractable Awning on Stucco
Installing a retractable awning on stucco isn’t just about mounting hardware.
It’s about understanding your wall, choosing the right tools, and following proper steps to avoid cracks, moisture damage, or instability.
With careful planning, you can achieve a secure installation, but stucco’s hidden complexities often make professional help the smarter choice.
Experts not only ensure structural safety but also protect your home’s aesthetics and long-term value.
If you want peace of mind and a flawless finish, entrusting the job to experienced installers is the best way forward.
Looking for professional and reliable awning installation for your stucco home? Contact Marygrove today to schedule a consultation.
Our in-house team has the expertise, tools, and experience to deliver a seamless installation that protects your walls and provides lasting shade you can count on.